 Save
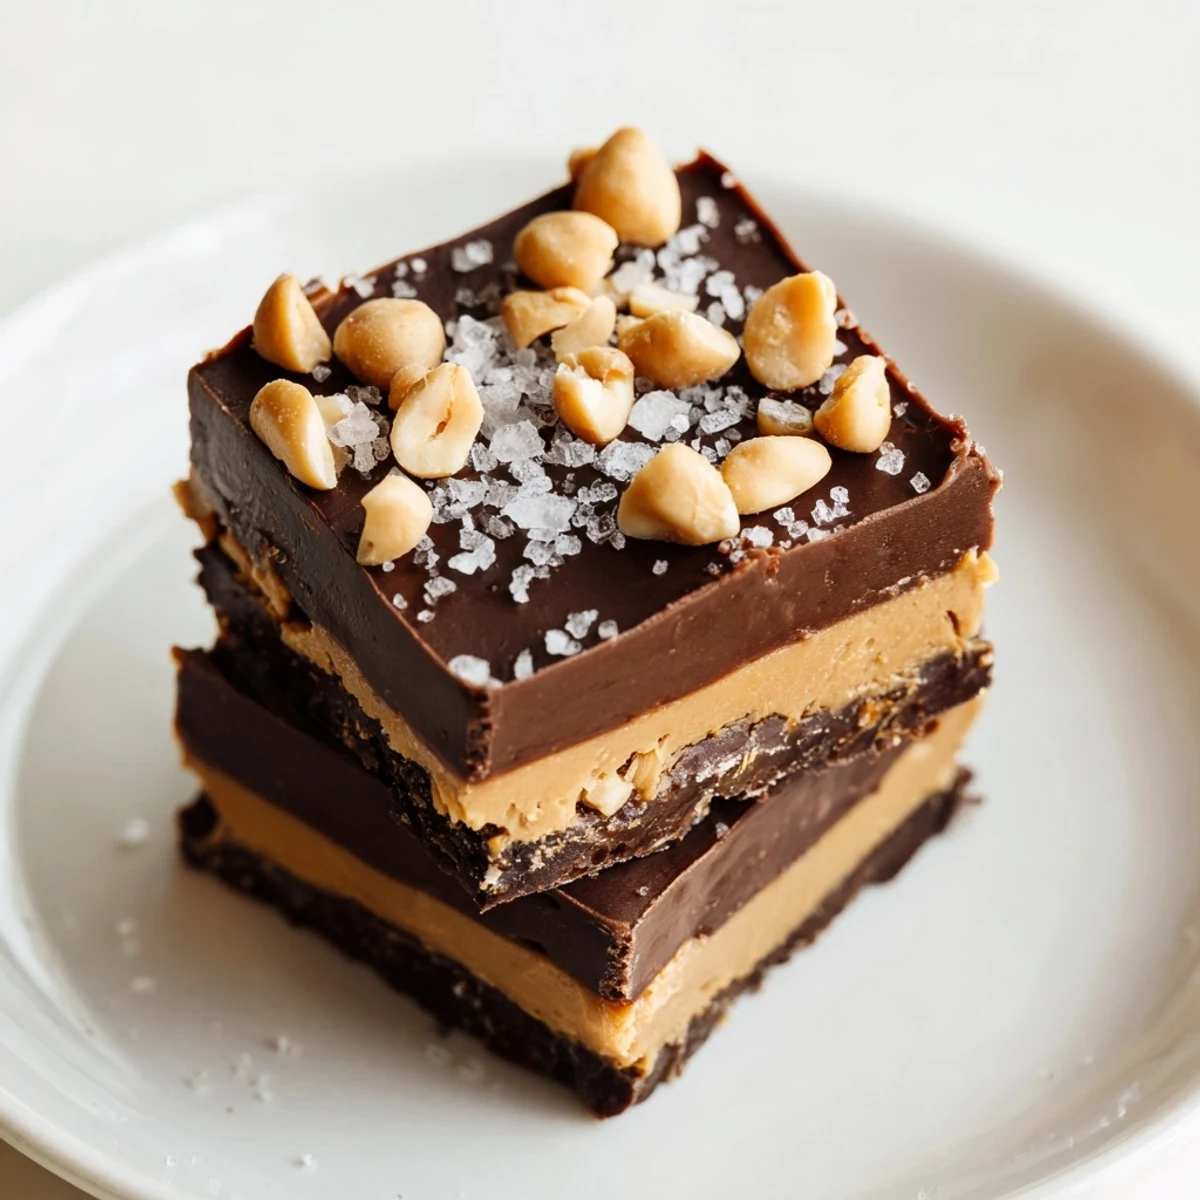
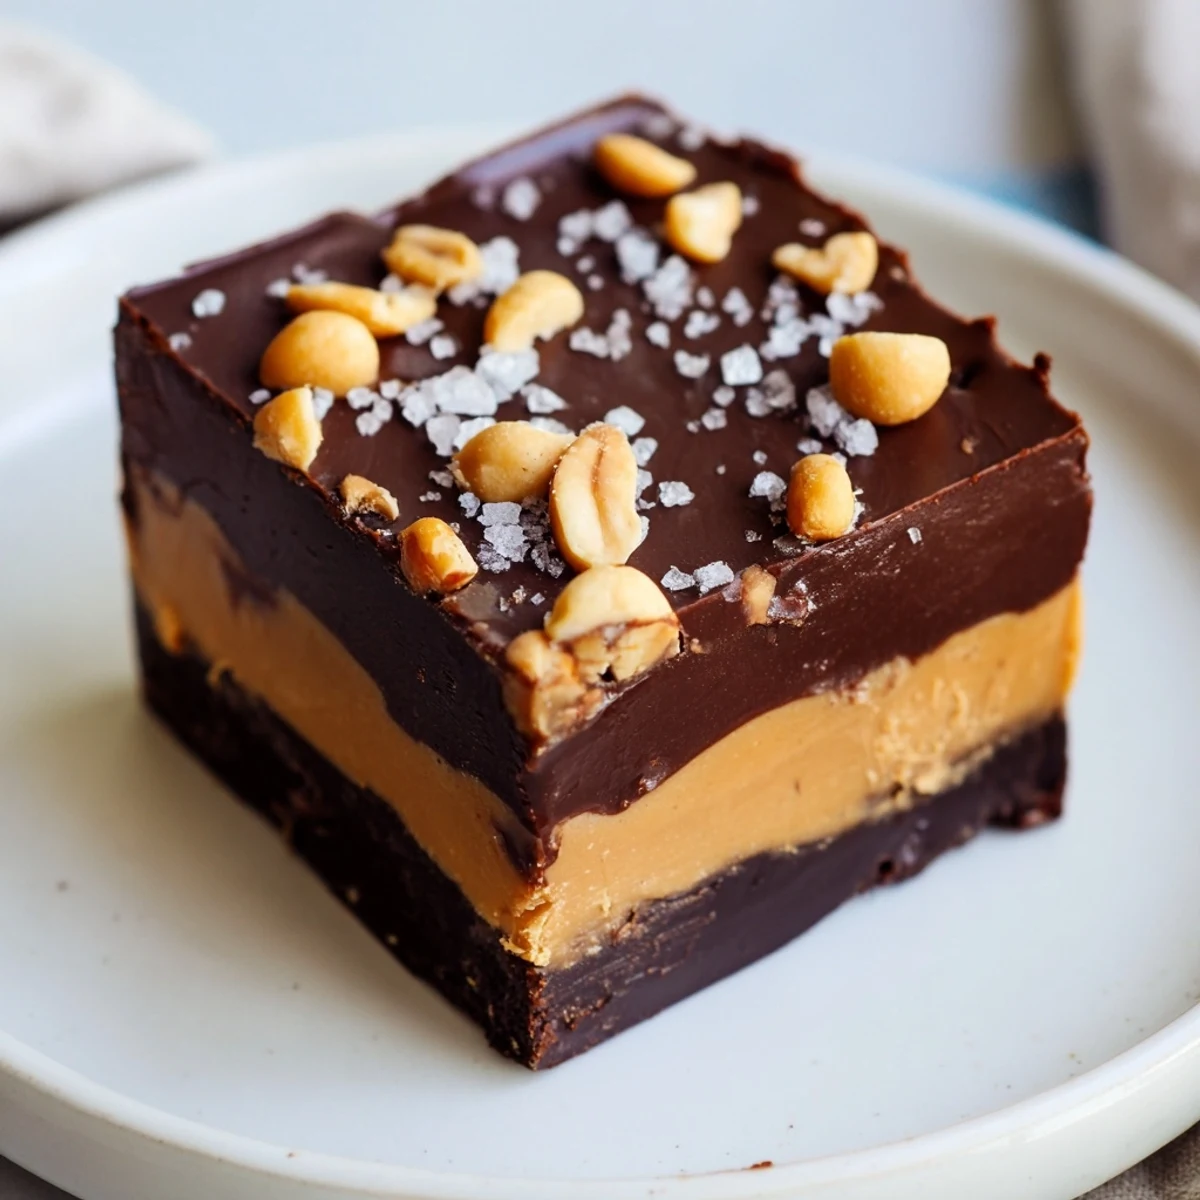
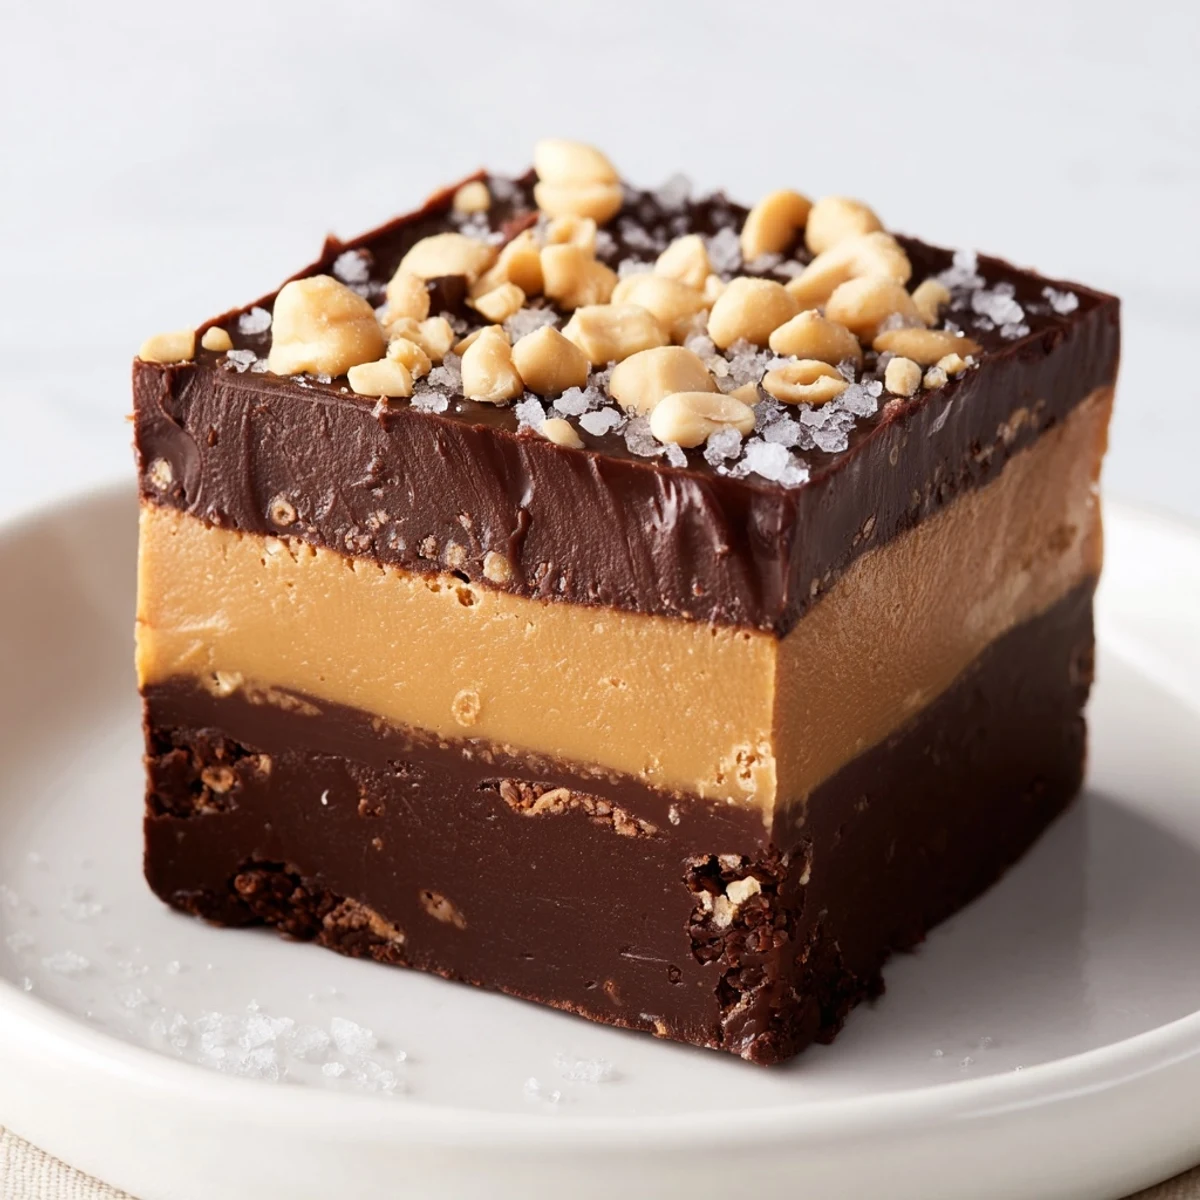
Save This indulgent fudge combines layers of smooth chocolate and creamy peanut butter for a rich, satisfying dessert. The base features melted chocolate chips with condensed milk, topped with a sweetened peanut butter mixture, and finished with another chocolate layer. Optional chopped peanuts and sea salt enhance the flavor profile.
With just 20 minutes of hands-on time and minimal ingredients, this no-bake treat requires only a few hours of chilling before serving. Perfect for special occasions or homemade gifts, this fudge stores well in the refrigerator for up to a week.
The cold winter evening I discovered this chocolate peanut butter fudge recipe changed everything about my dessert game. I'd been flipping through my grandmother's recipe box when this index card fell out, its edges worn and spotted with decades-old chocolate fingerprints. The combination was simple yet brilliant - velvety chocolate married with creamy peanut butter in perfect, indulgent squares.
Last December, I brought a batch to our neighborhood holiday exchange and watched as conversation literally stopped when people took their first bites. My usually chatty neighbor Tom went completely silent, closed his eyes, and then asked if he could take the entire plate home for himself. His reaction alone was worth the minimal effort this recipe requires.
Ingredients
- Semi-sweet chocolate chips: The foundation of our fudge needs to be high quality chocolate that melts smoothly, and I've found that standard semi-sweet chips offer the perfect balance between sweetness and rich cocoa flavor.
- Sweetened condensed milk: This magical ingredient creates that perfect fudge texture without any complicated cooking methods, essentially doing the heavy lifting for us.
- Creamy peanut butter: Use a commercial brand like Jif or Skippy rather than natural peanut butter, as the stabilizers help maintain the perfect consistency in the middle layer.
- Flaky sea salt: Just a tiny sprinkle transforms this fudge from merely delicious to absolutely addictive by enhancing both the chocolate and peanut butter flavors.
Instructions
- Prepare your pan:
- Line an 8-inch square baking pan with parchment paper, leaving some overhang on the sides for easy removal later. This little bit of preparation makes a world of difference when it's time to lift out your perfect fudge.
- Create the chocolate base:
- In a medium saucepan over low heat, combine chocolate chips, sweetened condensed milk, and butter, stirring constantly until melted and silky smooth. You'll know it's ready when the mixture looks glossy and pulls away slightly from the sides of the pan.
- Layer the chocolate:
- Pour about two-thirds of the chocolate mixture into your prepared pan, using a spatula to spread it evenly to the corners. Keep that remaining third of chocolate warm for the top layer.
- Mix the peanut butter layer:
- In a medium bowl, combine the peanut butter, powdered sugar, melted butter, and vanilla until you have a smooth, spreadable consistency. The powdered sugar might seem like it won't incorporate at first, but keep mixing and it will transform beautifully.
- Add the middle layer:
- Gently spread the peanut butter mixture over the chocolate base, taking care not to disturb the chocolate underneath. I find using an offset spatula or the back of a spoon dipped in hot water helps create a smooth, even layer.
- Top with remaining chocolate:
- Reheat your reserved chocolate mixture slightly if needed, then carefully pour and spread it over the peanut butter layer. Work quickly but gently to create a beautiful top coat.
- Add the finishing touches:
- While the top layer is still warm, sprinkle with chopped peanuts and that magical flaky sea salt. These toppings will sink in just enough to stay put but still add beautiful texture and visual appeal.
- Chill to perfection:
- Refrigerate for at least 2 hours until the fudge is completely set. Patience is difficult but absolutely necessary here for clean cuts and perfect texture.
- Cut and serve:
- Use the parchment paper overhang to lift the entire fudge block out of the pan, then cut into squares on a cutting board. For the cleanest cuts, wipe your knife with a warm, damp cloth between slices.
 Save
Save The first time my daughter helped me make this fudge, she was only six and insisted on being in charge of the sea salt sprinkle. She concentrated so hard on getting the distribution just right that her little tongue poked out the corner of her mouth. Now, five years later, she still claims that batch was the best we ever made, and she might be right.
Storage Tips
I've discovered through trial and error that this fudge actually improves after a day in the refrigerator, as the flavors meld and the texture settles into creamy perfection. Store cut pieces in layers separated by parchment paper to prevent sticking, and they'll keep beautifully for up to a week, though they've never lasted that long in my house.
Make-Ahead and Gifting Ideas
This fudge has saved me during countless holiday seasons when I needed impressive homemade gifts without spending hours in the kitchen. I've found that cutting larger squares and individually wrapping them in parchment paper, then placing them in small holiday tins creates gifts that friends now request by name every December.
Variations Worth Trying
After making this fudge dozens of times, I've experimented with several variations that have earned permanent spots in my recipe collection. Swapping dark chocolate for semi-sweet creates a more sophisticated flavor profile that appeals to adults, while using white chocolate instead of semi-sweet makes a striking reverse version with beautiful visual contrast.
- Add a layer of crushed pretzels between the peanut butter and top chocolate layer for an irresistible sweet-salty crunch that complements both main flavors.
- For special occasions, try pressing mini peanut butter cups into the top layer while still warm for an extra indulgent presentation.
- Stir 1/4 teaspoon of espresso powder into the chocolate mixture to subtly enhance the chocolate flavor without adding any coffee taste.
 Save
Save This chocolate peanut butter fudge has become more than just a recipe in my collection - it's a reliable joy-maker that never disappoints. Whether you're making it for yourself or to share, each batch carries a little bit of magic in its layers.
Common Recipe Questions
- → Can I use natural peanut butter for this fudge?
-
Natural peanut butter can be used, but the texture may be less consistent. For best results, stir natural peanut butter thoroughly before measuring, and consider adding an extra tablespoon of powdered sugar to help stabilize the consistency.
- → How do I know when the fudge is properly set?
-
The fudge is properly set when it feels firm to the touch and doesn't indent when lightly pressed. This typically takes at least 2 hours in the refrigerator, but allowing it to chill overnight produces the best texture and clean-cutting results.
- → Can I freeze this chocolate peanut butter fudge?
-
Yes! This fudge freezes beautifully for up to 3 months. Cut into pieces, then wrap individually in plastic wrap and store in an airtight container. Thaw pieces in the refrigerator or at room temperature for about 30 minutes before serving.
- → Why did my chocolate mixture become grainy?
-
Grainy chocolate usually results from overheating or exposure to moisture. Always melt chocolate over low heat, stirring constantly, and make sure all utensils are completely dry. If the mixture seizes, sometimes adding a teaspoon of neutral oil can help restore smoothness.
- → Can I add other mix-ins to this fudge?
-
Absolutely! Consider adding crushed cookies, mini marshmallows, toffee bits, or different nuts between layers. For a flavor twist, try adding 1/4 teaspoon of cinnamon or a pinch of cayenne to the chocolate mixture, or substitute almond butter for peanut butter.
- → What's the best way to cut fudge cleanly?
-
For clean cuts, use a large sharp knife dipped in hot water and wiped dry between cuts. Refrigerated fudge cuts more cleanly than room temperature fudge. You can also use a bench scraper for straight edges.